

How to Replace Batteries in SimpliSafe® Devices
Updated
| Does your Keypad look like the one pictured to the left? Then you're in the right place! You've got the Gen 3 SimpliSafe® system. If you purchased a system in 2017 or earlier, you have the Original SimpliSafe®. You can learn more about what batteries the Original SimpliSafe® devices use on our Help Center. You can also learn about the differences between our systems to determine which version you have. |

With the exception of the Base Station, SimpliCam® Wired Indoor Camera, Smart Alarm Indoor Camera, and Key Fob, all of the products for our Gen3 SimpliSafe® system have batteries that can and should be replaced periodically. When a sensor needs new batteries, your system will display an error message on the Keypad.
The Base Station requires specific rechargeable batteries; and the SimpliCam® Wired Indoor Camera only functions when connected to power, rather than being battery operated. The Smart Alarm Wireless Indoor Security Camera has non-replaceable batteries within it, and can be used on battery or plugged into a power outlet.
Finally, the battery within the Key Fob cannot be replaced. If you require assistance with your Key Fob, our Support team can assist you further.
Quickly access the product you want to replace batteries for from the list below:
Entry Sensor
The Entry Sensor takes a single Duracell CR-2032 Lithium 3V battery and has a life expectancy of up to 5 years, depending on placement and usage.
To replace your Entry Sensor's battery, slide it off of its mounting bracket. This will expose its battery, which can then be replaced.
If you find that your sensor does not come back online after replacing the battery, it’s possible that it may have been offline for too long. The best step would be to remove the sensor from the SimpliSafe® Mobile App and then add it back to your system.
To remove your Entry Sensor:
Open the SimpliSafe® Mobile App on your phone or tablet
Choose My System from the bottom navigation bar
Select Device Settings
Tap on the sensor you wish to remove
Choose Remove Device
Once you have removed your sensor, you can add it back using our Installation Guide.
Motion Sensor Gen 1
Slide the Motion Sensor off of its mounting bracket. This will expose its CR-123A Lithium 3V battery, which can then be replaced.
If the sensor does not come back online after changing the battery, it’s possible that your sensor has been offline for too long. The best step would be to remove the sensor from the SimpliSafe® Mobile App and then add it back to your system.
To remove your Motion Sensor Gen 1:
Open the SimpliSafe® Mobile App on your phone or tablet
Choose My System from the bottom navigation bar
Select Device Settings
Tap on the sensor you wish to remove
Choose Remove Device
Once you have removed your sensor, you can add it back using our Installation Guide.
Motion Sensor Gen 2
The Motion Sensor Gen 2 takes a single CR-123A Lithium 3V battery and has a life expectancy of up to 4 years depending on placement and usage.
To change your Motion Sensor Gen 2 battery, slide the sensor up and off its bracket. Then, replace the battery and slide it back onto its bracket.
If the sensor does not come back online after changing the battery, it’s possible that your sensor has been offline for too long. The best step would be to remove the sensor from the SimpliSafe® Mobile App and then add it back to your system.
To remove your Motion Sensor Gen 2:
Open the SimpliSafe® Mobile App on your phone or tablet
Choose My System from the bottom navigation bar
Select Device Settings
Tap on the sensor you wish to remove
Choose Remove Device
Once you have removed your sensor, you can add it back using our Installation Guide.
Glassbreak Sensor
The Glassbreak Sensor takes a single Duracell CR-123A Lithium 3V battery and has a life expectancy of up to 3 years, depending on placement and usage.
To change your Glassbreak Sensor's battery, slide the sensor up and off of its mounting bracket. This will expose its battery, which can then be replaced.
If the sensor does not come back online after changing the battery, it’s possible that your sensor has been offline for too long. The best step would be to remove the sensor from the SimpliSafe® Mobile App and then add it back to your system.
To remove your Glassbreak Sensor:
Open the SimpliSafe® Mobile App on your phone or tablet
Choose My System from the bottom navigation bar
Select Device Settings
Tap on the sensor you wish to remove
Choose Remove Device
Once you have removed your sensor, you can add it back using our Installation Guide.
Smoke & Carbon Monoxide Detector
The Smoke & CO Detector takes two CR-123A Lithium 3V batteries and has a life expectancy of up to 2 years, depending on placement and usage.
To change your Smoke & CO Detector battery, twist it off its bracket and open the back panel. Then, replace the lithium batteries and put the device back in place.
Smoke & Carbon Monoxide Alarm Listener
The Smoke & Carbon Monoxide Alarm Listener takes one CR-123A Lithium 3V battery and has a life expectancy of up to 3 years, depending on usage.
To replace your Alarm Listener’s battery, twist it counter clockwise off its bracket to reveal its battery. Then, replace the battery and twist the device back on its bracket.
Smoke Detector
The Smoke Detector takes one CR-123A Lithium 3V battery and has a life expectancy of up to 5 years, depending on usage.
To replace its battery, twist the Smoke Detector off its bracket and open the back panel. Then, replace the battery and twist the device back on its bracket.
Carbon Monoxide Detector
Position the Carbon Monoxide Detector in your hand so that the “DO NOT PAINT” text is right side up, directly in front of you. The shape outlining the “CARBON MONOXIDE ALARM” text is the battery cover.
Press your finger into the oval-shaped button below the “DO NOT PAINT” text.
Once you feel the button compressing, slide the battery cover towards you. This will expose the three Energizer AA “Ultimate Lithium” 1.5V* batteries, which can then be replaced.
Keypad
The Keypad takes four Duracell AA Alkaline batteries and has a life expectancy between 8-12 months, depending on placement and usage.
To change your Keypad's batteries, slide the device up and off its bracket and remove the batteries. Wait at least 3 minutes, then insert the new batteries into the back of your Keypad.
Keypad’s batteries are dying too fast
If you find that the batteries in your Keypad are dying quickly, it can help to enable power savings mode. Turning on power saving mode will turn off the proximity sensor in the Keypad that tells the device to light up when someone gets close to it.
To enable power saving mode:
Press the Menu button on the Keypad
Enter your Master PIN
Select Devices
Select your Keypad
Choose Power Savings
Use the Keypad’s arrow to toggle the setting on
Extra Siren
The Extra Siren takes four AA Alkaline Batteries and has a life expectancy of up to 1 year, depending on placement and usage.
To replace your Extra Siren's batteries, slide the device up and off its bracket. Using a Phillips-head screwdriver, remove the four screws that are holding the battery cover in place. Remove the battery cover to expose four AA batteries, which can then be replaced.
Panic Button
The Panic Button takes one Duracell CR-2032 Lithium 3V battery and has a life expectancy of up to 5 years, depending on placement and usage.
To replace your Panic Button's battery, slide it up and off of its mounting bracket. This will expose a single Duracell CR-2032 Lithium 3V battery, which can then be replaced.
Smart Lock
The Smart Lock is powered by four Duracell AA Alkaline batteries, and the PIN Pad takes two Duracell CR2450 Lithium Batteries. The batteries within the Smart Lock and PIN Pad have a life expectancy of 8-12 months, depending on usage.
To change your Smart Lock batteries, follow the steps below:
1. Slide the battery cover (the oval portion of the Lock labeled "SimpliSafe") off the device by pulling down on it.
This will expose the batteries and allow you to replace them.
2. Once the batteries have been replaced, put the battery cover back on and slide the compartment up until it clicks into place.
To replace the PIN Pad batteries, follow the steps below:
1. Use the pinhole key that was included in your Smart Lock box and press the tool into the pinhole on the bottom of the PIN Pad
If you do not have the pinhole key still, a SIM Card tool or a paperclip may also work
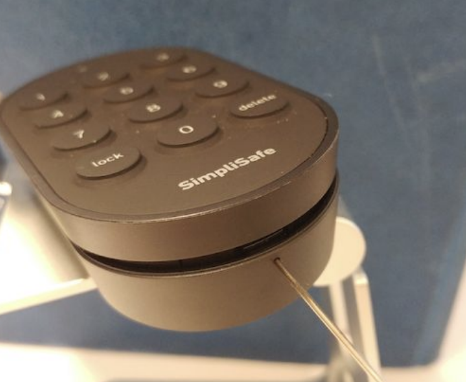
2. Once the pinhole has been pressed, the top of the PIN Pad will pop off and you will then be able to replace the batteries
3. After the batteries have been replaced, press the PIN Pad top back on until it clicks into place
If the Smart Lock does not come back online after changing the battery, it’s possible that your lock has been offline for too long. The best step would be to remove the Smart Lock from the SimpliSafe® Mobile App and then add it back to your system.
To remove your Smart Lock:
Open the SimpliSafe® Mobile App on your phone or tablet
Choose My System from the bottom navigation bar
Select Device Settings
Tap on your Smart Lock
Choose Remove Device
Once you have removed Smart Lock, you can add it back using our Installation Guide.
Temperature Sensor
The Temperature Sensor takes one Duracell CR-2032 Lithium 3V battery and has a life expectancy of up to 5 years, depending on placement and usage.
To change your Temperature Sensor's battery, remove it from its bracket to expose the battery compartment. Then replace the battery and slide the sensor back into place.
If the sensor does not come back online after changing the battery, it’s possible that your sensor has been offline for too long. The best step would be to remove the sensor from the SimpliSafe® Mobile App and then add it back to your system.
To remove your Temperature Sensor:
Open the SimpliSafe® Mobile App on your phone or tablet
Choose My System from the bottom navigation bar
Select Device Settings
Tap on the sensor you wish to remove
Choose Remove Device
Once you have removed your sensor, you can add it back using our Installation Guide.
Water Sensor
The Water Sensor takes one Duracell CR-2032 Lithium 3V battery and has a life expectancy of up to 5 years, depending on placement and usage.
To replace your Water Sensor's battery, twist the bottom and top apart and replace the battery inside. To close it again, make sure that the grooves are aligned before twisting it shut.
If the sensor does not come back online after changing the battery, it’s possible that your sensor has been offline for too long. The best step would be to remove the sensor from the SimpliSafe® Mobile App and then add it back to your system.
To remove your Water Sensor:
Open the SimpliSafe® Mobile App on your phone or tablet
Choose My System from the bottom navigation bar
Select Device Settings
Tap on the sensor you wish to remove
Choose Remove Device
Once you have removed your sensor, you can add it back using our Installation Guide.
Wireless Outdoor Security Camera
The Wireless Outdoor Security Camera has a rechargeable battery with an expected 3 months lifetime, depending on usage and placement.
To remove the battery, simply untwist the cap on your Outdoor Camera. Then, use the tab on the battery to gently remove it from the battery compartment.
To charge your battery, you’ll need a USB-supported power brick that supports 5V, 7.5W+, 1.5A+ charging. Using the supplied cable, plug it into the power brick and the camera and charge your battery. To fully charge your battery, it can take up to 5 hours. You’ll know the battery is fully charged once all 3 lights are illuminated and no longer pulsing.
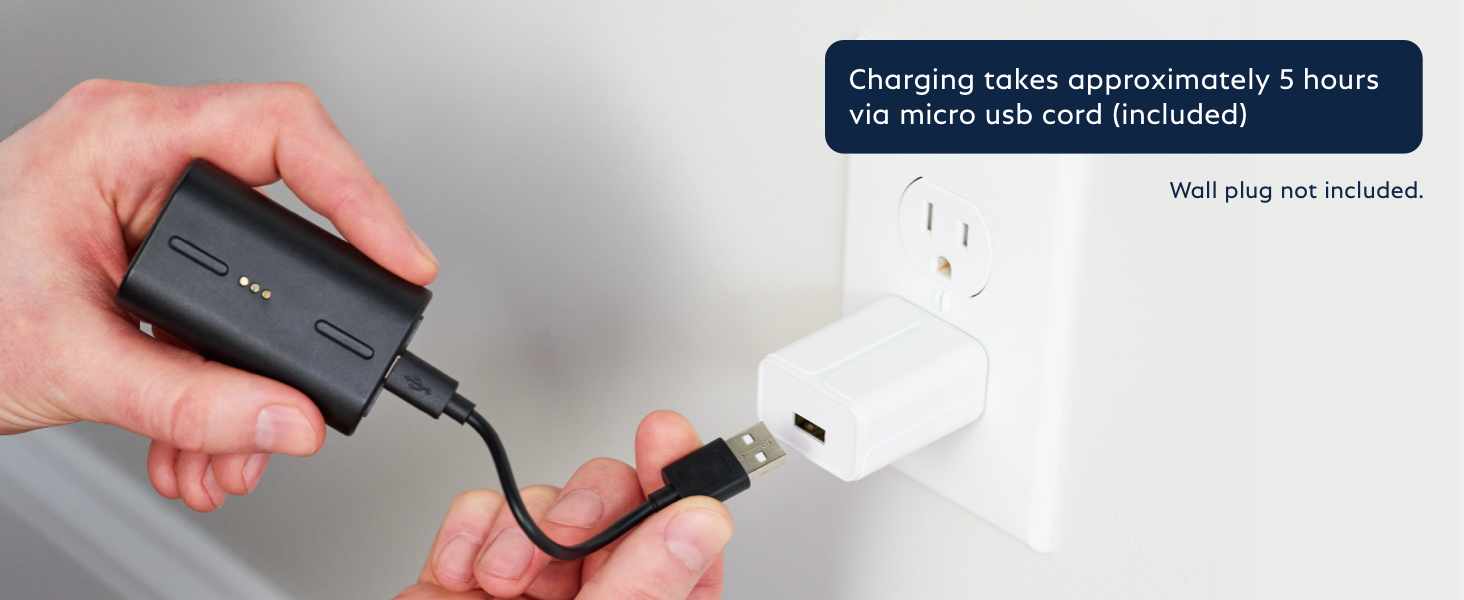
To replace your battery, slide it back into the battery compartment in the Outdoor Camera with the tab facing outwards. Then, twist the cap back onto the Outdoor Camera until you hear it click.
Outdoor Camera Series 2
The Outdoor Security Camera Series 2 has a rechargeable battery that lasts up to 3 months depending on settings and usage. If you plan on using your Outdoor Security Camera Series 2 with SimpliSafe® Active Guard Outdoor Protection, you will need to plug your camera into power using the outdoor power cable.
To remove the battery, simply untwist the front of the camera off of your Outdoor Camera Series 2. Then, use the pull tab on the battery to gently remove it from the battery compartment.
To charge your battery, you’ll need a USB power brick that supports 5V, 1.5A+ (7.5W+) charging. Using the supplied cable, plug the battery into the power brick to charge your battery. To fully charge your battery, it can take up to 6 hours. You’ll know the battery is fully charged once all 3 lights are illuminated and no longer pulsing.
To replace your battery, slide it back into the battery compartment in the Outdoor Camera Series 2 with the 3 gold circles on the battery facing up and the battery’s tab facing outwards. Then, twist the cap back onto the Outdoor Camera Series 2 clockwise until you hear it click.
You’ll know that your Outdoor Camera Series 2 has been assembled properly once it makes a high-pitched chime.
Still Need Help?
If the battery for your SimpliSafe® product was recently replaced, it can take up to 21 hours for the low battery or offline warning to clear. You can bypass this time frame with the following steps:
Using your Keypad, press the Menu button
Enter your Primary PIN
Scroll until Test Mode is highlighted
Use the right arrow and tap to the right to enter Test Mode
Locate the test button on your SimpliSafe® device and press it three times
This will cause the device to check back in with the Base Station and should clear the low battery or offline warning
If those steps do not work, we recommend removing the camera or sensor from your account and reinstalling it using the corresponding installation guide on our Help Center