
Outdoor Camera Permanent Mount Installation Guide
Updated
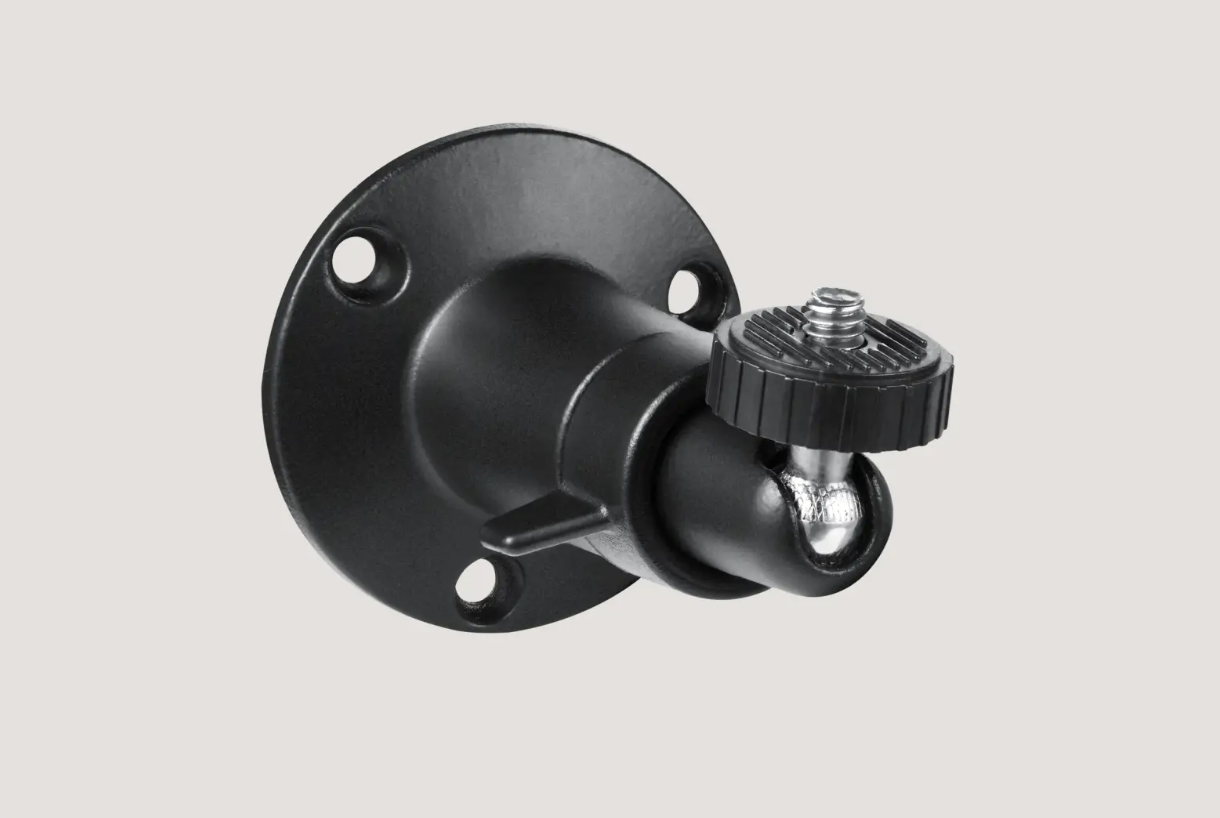
The Outdoor Camera Permanent Mount is a great way to install your camera anywhere with an extra-sturdy screw-in mount. This mount is perfect for walls and overhangs, bringing you peace of mind that your camera is harder to tamper with.
The following article will walk you through the installation process of the Outdoor Camera Mount. Installation video coming soon!
Before Getting Started
We recommend installing the Outdoor Camera Mount with a power drill, instead of a Phillips head screwdriver. You’ll need a 7/64" drill bit for pilot holes or 3/16" for the anchors. If you are installing the Outdoor Camera Mount onto brick, stone, or stucco, you may also need wall anchors (not included in the box).
Placement Tips for the Outdoor Camera Mount
Ensure that the Outdoor Camera is placed no lower than 6 feet from the ground, but no more than 8 feet high
We recommend mounting your Outdoor Camera at 7-8 feet for best performance
The Outdoor Camera should be angled down slightly, roughly a 30-degree angle
If the Outdoor Camera is mounted upside down, the motion sensitivity is halved from ~30 feet to just about ~15 feet
The Outdoor Camera is most sensitive to side-to-side motion, so the camera should be positioned towards areas where people will walk across its field of view, rather than walking towards the camera.
You’ll also want to identify factors that could dramatically change in temperature or interference regarding the Outdoor Camera’s heat signature detection. For example, driveways that can get very hot in the summer, or a flag moving in the wind and causing a cool shadow.
Outdoor Camera Mount Installation Guide
If you are installing into brick, stone, or stucco - you may need to pre-drill holes with your 3/16” drill bit. Once the holes have been drilled, hammer in the wall anchors to support the installation of the screws.
Attach the mount to the wall or overhang with the included screws
Secure the Outdoor Camera to the threaded screw on the mount by rotating the camera clockwise. Continue to rotate the camera onto the threaded screw until it cannot rotate anymore. This will ensure that it’s fully threaded onto the screw and secured to the mount.
Tighten the lock nut against the Outdoor Camera to prevent the camera from unscrewing. Rotate the lock nut counterclockwise until it’s tight against the Outdoor Camera.
Rotate the mount wing nut counterclockwise to loosen the torque on the mount, allowing the camera to move freely
Adjust the camera to the position you want it to be in to provide coverage for your home or business
For optimal performance, we recommend installing the camera 6-8 feet off the ground and angle it 30 degrees down. In this orientation, the camera can detect up to 30 feet of motion.
If mounting the camera upside down (such as on an overhang) the camera will be able to detect up to 15 feet of motion.
Once you are happy with the position of the camera, rotate the wing nut clockwise and tighten it firmly. You’ll want to tighten it as much as possible, to ensure that the camera will not lose its orientation over time.
Hold onto the camera while doing this to ensure the camera maintains its orientation.
That’s it! Your Outdoor Camera Mount has been installed! If you haven’t done so yet, please install your Outdoor Camera using our Installation Guide.
Troubleshooting the Outdoor Camera Mount
The most common issues stem from the lock nuts and wing nuts not being adequately tightened. You’ll want to rotate these to ensure they are tight, and cannot be tightened further. That will prevent the camera from rotating on the screw, or prevent drooping of the camera over time.